Monday, March 25, 2013

How our Aquaponic system works...

Made up a bit of a clip on Sunday just showing how the aquaponic system is configured for now.. I think it will always be a work in progress as there will always be something to play or experiment with.. Have already got a few ideas on how the new beds will be made, arranged 7 plumbed up.. Just need to wait for some plants to wind down before I can start moving the bed to make some room :)»


For more regular updates & pictures from the patch come visit us on our "Bits Out the Back" Facebook page..
Have a great one All...

Thursday, March 14, 2013

How to plant broccoli & other brassicas..

Was blown away by how well the broccoli & cauliflower did last year after trying this simple technique.. I came across this method of planting out brassicas last year & was very pleased with the results.. The plants that were planted in loose soil only did fair to average so decided to plant them all into firm soil this season.. 


Updates on how the plants all go will be included in the Autumn & Winter walk around clips..

For more regular updates & pictures from the patch come visit us  Bits Out the Back
onFace Book

Have a great one All...

: )»


Sunday, March 10, 2013

Root Knot Nematodes & their control..

Root Knot Nematode..

Over the past few years we have seen an increased level of root knot nematode infestation in the veggie patch.. This is due to poor crop rotations, spreading contaminated soil through transplanting & reusing old soil in new beds.. There are some plant varieties, especially in the Fabaceae family that includes peas & beans, have root nodules.. These are caused by a beneficial bacteria, called rhizobia, that form a symbiotic relationship with the plants helping them to fix nitrogen from the atmosphere to the soil..

Root knot nematodes are microscopic parasitic worms that burrow into the roots of your plants.. Once inside the root system the plant cells grow around the parasite creating the telltale galls that can be found on the plants roots.. The nematodes continue to feed off the plant robbing it of nutrients, mate then disperse its eggs in the surrounding soil.. I think we are lucky as the wicking beds are a standalone sealed growing system so if we can get on top of them they shouldn’t reoccur, as long as we don’t spread contaminated soils & make more of an effort to clean garden tools between using them in multiple beds..


Detecting them can sometimes be rather difficult & generally it’s too late when you do.. I have found that our plants start off looking healthy but then the growth rates start to slow.. I have noticed that the leaves start to look off colour (yellowing) with fruiting plants, like cucumbers & tomatoes, & they have less fruit set than normal.. I have now learned to gently dig around the roots of the plants I suspect of infection to see if there are any galls present on the roots..  If left undiagnosed & untreated it can lead to the death of the plant..

There are a number of ways to treat these little pests.. 
The easiest way to try & keep them at bay would be to have a nice rich soil made up of plenty of organic matter that will encourage not only healthy plant growth but also beneficial nematodes into the garden.. These beneficial guys will happily feed on their root knot relatives.. Couple this with good crop rotation of susceptible plant varieties (bean, lettuce, tomato, capsicum/pepper, eggplant, strawberry, cucumber, pumpkin, squash, melons, celery, ginger, beetroot, garlic, sweet potato, potato, carrot) & the risk of infection will be reduced.. 

Some plants, like marigolds & mustard, release compounds from their roots which affect nematodes.. Companion planting with these plants in garden beds can aid in deterring an attack on your plants however, once the beds are infested it is probably better to plant these as a green manure crop.. One suggestion I have read is to let mustard or marigolds grow until they are about 450mm/1½’ tall then dig it through the soil.. They then start to break down, not only adding beneficial organic matter to the soil but also releasing compounds toxic to the nematodes into the soil.. 

I have found that the quickest & easiest way to control nematodes is through the use of a molasses water mix recommended by the late, great Colin Campbell from “Gardening Australia”.. We have applied this mix to a few beds/barrels & have been blown away but the way the plants have reacted.. We had an infested wicking barrel that was home to some extremely gnarly looking beetroot as well as a very sad & stunted warrigal greens plant.. 

Once the beetroot were all removed, 2 cups/500ml of the molasses mixture was poured over the barrel & a okra was planted.. The results were visible I under a week with the warrigal greens pushing out new growth & flowers after a few months of next to no growth what so ever.. The okra has grown into the largest plant we have, unlike its stunted relatives that were planted into beds I have since found to be infested..

Here is Colin Campbell nematode recipe..
500ml/2cups molasses to 2L/½gal of water (1:4)
Mix well & apply to 1½M/yard² of garden bed..
I have spot watered some capsicum plants in an infected bed & found that they reacted very positively by sending out lush new growth & setting a 2nd, larger round of fruit.. 


Neem is another control method that has had a long history in India for the use on nematodes, as well as other plant eating insects.. I have tried using a neem oil preparation on a couple of beds in the past but unfortunately it didn’t do the job due to the low concentration rate used.. So I will save posting on that until I have it sorted out & have better results to report..

I have read in a few places on the internet that molasses can have a detrimental effect on soil flora & fauna but I have found the opposite to be the case in our beds..  All the beds treated have rewarded us with healthy, productive plants.. I have no formal horticultural training & don’t consider myself to be an expert, so I encourage everyone to look into it for yourself..
All I can do is share my own observations & the results of trialling different techniques within our own garden.. If your garden is suffering from nematodes, give it a go and let me know what worked best for you..   

Have a great one..
Rob...

You can also visit our garden on Face Book & You Tube..


Some helpful reference links..
http://www.abc.net.au/gardening/stories/s3153496.htm
http://www.abc.net.au/gardening/stories/s2262098.htm
http://www.abc.net.au/gardening/stories/s2534493.htm
http://www.abc.net.au/gardening/stories/s2607562.htm

Friday, March 8, 2013

How to save time and money when starting tomato plants for your garden

Here for your reading pleasure is an article from a You Tube friend of mine.. Was such a great article that I asked his permission & have posted it here for your reading pleasure.. If you would like to check out more of Dales clips you can find his You Tube channel Easy Grows It here, & the site that the article come from goes by the same name & can be found at easygrowsit.com .


How to save time and money when starting tomato plants for your garden

By Easy
easy@easygrowsit.com
February 24nd, 2013
If you, like many of us, grow lots of tomato plants for your garden every year, you start them from seed. Starting from seed can be tedious, time consuming and sometimes quite frustrating. You have to plan ahead so your little crop is ready to plant when the time is right. This usually means starting your seeds from 6-8 weeks before it’s time to plant them in the garden.
To start our seeds, some of us use 10″ x 20″ trays with cells for each seed. Others use anything from solo cups to microwave dishes from their last frozen dinner. It doesn’t matter what you grow them in, you’ll need to make sure they always get the proper amount of water, light and warmth to start them right. It requires a certain amount of attention at this stage and mistakes can set you back to the point of having to start over. Forget to water your little tomato plants and you could end up with plants that are stunted or dead and you could have to start all over.
At some point in the process, you’ll need to transplant the little seedlings into larger containers at least once. Depending on how large you want them at planting time, maybe twice. As I said above, it can get a little tedious and time consuming, especially if you’re doing the same with other plants like peppers at the same time.
The obvious alternative to growing tomato plants from seeds is to go buy small plants from a local nursery or home improvement store just before you need to put them out in the garden. Depending on how many plants you need, it can be quite expensive. If I remember correctly, last year the price of small tomato plants at home improvement stores were about US$3.50 each in 4 inch pots. If you bought a dozen plants, you were looking at around $42 plus tax. How many tomatoes would it take to make up for a $42 investment? That’s assuming all your plants survived to produce tomatoes.
So, starting tomatoes from $1.50 worth of seeds is easily more economical although much more risky and difficult. Buying plants somewhere is much less risky but much more expensive. What if I told you that you could have the benefits of both choices without the huge monetary outlay and without having to monitor dozens of baby plants from seed? Would that be something that might interest you? If it is, please read on.
For those of you that do not know much about tomatoes and tomato plants, let me give you a little background information before I move on. Tomatoes are actually a fruit, not a vegetable. I, like many, was not aware of this fact for quite some time and I was quite surprised to hear that. Tomato plants are actually vines, unlike, say, a bell pepper plant, which is technically a tree.
Vines are interesting plants. Some if not most vines (I don’t claim to be a vine expert or any kind of expert for that matter) will sprout roots when buried in soil. More roots means more water and nutrients for the plant as well as having a stronger base in the ground to support the plant. You can actually plant a tomato plant, with proper preparation, horizontally in a trench leaving just the very top of the tomato plant sticking out of the ground. It will develop many more roots than with the typical planting method and it will be much more strongly rooted in the ground as well. This is called the trench planting method. If you’d like to see exactly how this works, here’s a link to a You Tube video my friend Bobby (Mhpgardener on You Tube) did showing how it’s done…Planting Tomatoes – A Quick Tip
Tomatoes grow new baby plants at the intersection where a branch and the main stem meets. This intersection is typically called a crotch and the new baby plant that develops there is usually called a sucker. I am sure there is probably a more scientific name but gardeners usually call it a sucker because it takes energy away from the main plant to grow this new baby plant. Remember, a tomato plant is a vine and vines like to spread all over. Some tomato growers remove these suckers and others like to leave them on. I’ll leave that subject for another article.
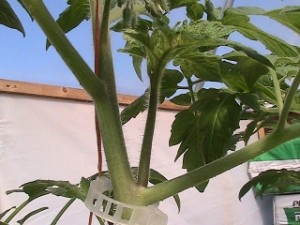
Picture of a sucker growing from a tomato plant courtesy of mhpgardener of You Tube.
At this point, you might be saying to yourself, “This is all very interesting and good but what does all this have to do with how I get a bunch of tomato plants to plant in my garden?” I appreciate your patience dear reader and now that I have explained enough background information, let’s get to the point.
Suckers, as I said, are baby tomato plants. It’s like a another tomato plant growing out of the main tomato plant, which is called the mother plant. If you would snip off a decent sized sucker (six inches long or longer with a few full sets of leaves) from the mother plant and stick the bottom of the sucker in water, in a matter of three days to a couple of weeks, depending on the variety of tomato plant, you should see roots develop under and at the water line. Once they start to develop roots, those roots will grow at a very rapid rate. This is called “rooting” a plant. It’s also called “cloning”.
After the roots get a few inches long (don’t let them get too out of hand) you can transplant the new tomato plant into soil and it will grow like any other tomato plant in soil. Now, the really amazing as well as useful part of this whole process is that not only does the new sucker derived plant give you a whole new plant to grow, it doesn’t know it’s a new plant. To it, it’s a fully developed tomato plant, not a 6 week old baby plant that grew from seed and is still maturing. If the mother plant is three months old, the sucker is just as mature, just smaller. It’s ready to put on flowers and start bearing fruit right away unlike it’s six week old, grown from seed counterpart.
So now, let’s put it all together. If you needed a dozen or so tomato plants, instead of planting twelve seeds 6-8 weeks ahead of time, you could grow one or two mother plants a month or two earlier than that so they have suckers a few weeks before you needed plants to put in the garden. Not only will the sucker derived plants be more mature and ready to start producing right away, you’d be using less seeds and can still get more suckers later from the mother plant in case something terrible happens to your garden such as hail storm. The mother plant will continue to keep making suckers for you in case you need them.
I almost forgot! There’s another reason to generate plants this way. Not only will the mother plant give you lots of baby plants, chances are, depending on when you started your mother plant, it will also give you tomatoes as well by the time you start setting your new plants out in the garden.


Don't forget to check out Dale's You Tube channel & Web site..

Have a great one all

: )»


Aquaponic radial flow filter cleaning & pipe maintenance..

Time to clean out the filter & also solve a few mysteries involving the murky water that appeared from nowhere previously.. The filter is straight forward & we ended up with some great liquid to put on the garden beds..

 
Was good to solve the murky water in the fish tank mystery from a few weeks back... Was a bit of a "facepalm" moment as I turned the pump off & back on before both previous cloudy water events.. I think the gold fish are the culprits as the majority of the solids should be cleaned out as the water goes through the grow beds.. Cleaning the feeder pipe from the sump is something that should really be done every second week I think... Getting rid of the goldfish will also help to reduce the volume of solids in the line so we will be looking into getting them out ASAP..

For more regular updates & pictures from the patch come visit us on our Bits Out the Back Face Book page..
Have a great one All...  
: )»


Friday, March 1, 2013

Aquaponic update.. Water quality, Algae bloom testing, Buffering pH & Happy Fish..

Time for a bit of an update on the water quality issues the system was having last week..
I think time was all that was needed for the cloudy water to rectify itself & I sort of stressed myself out for nothing as it wasn't an algae bloom like I thought.. At least I got to learn a few more things about system management & in particular how to test for an algal bloom.
Would like to thank Paul from Earthan group again for taking time out of his busy schedule to give me a call & a hand in working out what was going on.. They can also be found on Face Book..


Will finish off the buffering filter over the next week or so & shall show you what I come up with..

For more regular updates about the patch come visit on our Bits Out the Back Face Book page..
Have a great one All...
: )»